Monday, December 8, 2008

Desert group working on making their test models-Continued...: Interactive-Progressive-Gateway


Again in these pictures we are working on our molds and platforms. 

Desert group working on making their test models: Interactive-Progressive-Gateway


All of these pictures are of our group working together to make our very first test model. Some of the pictures involve carving the insulation foam ,casting our mold ,or making our mold.  

Sunday, December 7, 2008

Living on the Edge Work Summary


Casting was a true trial and error experience throughout the various molds, strategies and aggregates. In the end, we found what worked: plastic square molds, some wood and a few cardboard boxes. We found our base was 1'-0" by 1'-0" at 3'-0"thick. 
One of our molds was rectangular because it was to be placed across from the desert group at the bottom of the property/hill. So we wanted to be able to bury it in the ground to look 1'-0" by 1'-0" like the rest of the Living Edge models. 


Bray and Kristina working on carving out their first attempt at foam curves. They were able to create a second model that allowed them to make a better version of this first attempt. 

An example of a first mold gone bad. It was sad to see the wood shop work and some concrete and aggregate go to waste, but it was a beneficial learning experience and times like these assisted our group in making rational and strategic decisions by the presentation. 
Random FYI: It was very cold during the majority of the casting process. 


The casting took us about two to three days depending on the size of each mold to officially turn green and eventually harden. We were expecting a much longer drying process due to the cool temperatures outside or possible cracking but thankfully ran into very few bumps in the road. 


Wednesday, December 3, 2008

Desert Group- Texture:Rippling


These are our test models to see how our texture would turn out. We decided that is was a success...as far as the texture goes. 

Monday, December 1, 2008

Desert: Interactive-Progressive-Gateway: Exibit


The first and fourth pictures are our to scale models of our island desert. And the other pictures are of our group's exhibit for the critique on Monday, December 1st.

Desert: Interactive-Progressive-Gateway:Initial Ideas


The very first picture is a collaboration of point words that our group came up with, so that we could use them to channel into our concepts. Some of the point words are no longer relevant to what we are doing currently. However, all of the words are apart of our thought process as a group and got us to the point we are at now.

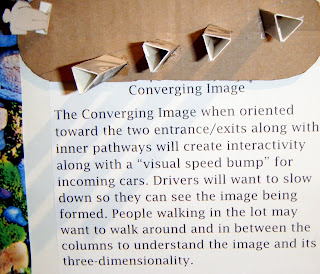
The next picture is of our converging image idea. The main point for this is for it to work as a visual speed bump. We would use our ripple texture to create a sand dune image that would be visually completed as you pass by or drive by the island. And parts of the complete image are on separate parts on each platform(there are four platforms). And we all decided as a group that we wanted to do something that worked with vertical objects. So we came up with the platforms...Then the issue became,"How many should we have?" So finally we all concurred that four would be a good number because it wouldn't make the island to busy but it was enough that you could gather the image and was the right number to create interaction.

The next picture is of the rippling in the sand dunes within the desert. We decided that this would be a good texture to incorporate within our concrete objects. Because it reflects the desert but is still suttle and not to overwhelming.

This is of our group parti. Some of our initial plans were to create a water catcher, use mosaics, and incorporate a desert rose within our island as well. We wanted the water catcher to incorporate water some how. However, the issue arose of there not being anyone to keep it clean and the water would become stagnant. And then within the center of our four platforms we had decided that since we could not do the water catcher that we needed something in the center, so we devised a way to create a desert rose, and then we were going to cast it and mosaic it with glass. Our idea was that it would create a mirage effect when the light would hit the glass. However, we finally came to the epiphany that we do not have to have anything in the center. So we refined our ideas a lot. And so our design plan now is to have the four platforms and orient them diagonally towards the building so people are directed to the building. And we also have the rippling texture was over all of the platforms.

Sunday, November 30, 2008

Desert:Interactive-Progressive-Gateway: One of our test models


This is the desert groups test model. We mixed plaster and concrete and used pea pebbles as an aggregate.

For our mold we used a cardboard box and reinforced it with concrete. We then to insulation foam and cut it to fit all the sides and the used an xacto knife to carve out the ripple, so that we could achieve the ripple texture. And we made the cast hollow by creating a smaller rectangular prism out of the insulation foam. This is a representation of our smallest platforms.

However, there was a flaw with using the cardboard box. It was not quite strong enough to support the strength and bond of the concrete and it let the concrete seep into the edges enough...that it did not quite create the edges that we had hoped for.

We all worked cohesively to create this test model. Some of us mixed the concrete, while others of us carved ripples into the foam to get the texture that we wanted for our platforms.

Finishing Touches


Pictured above are Chey & Kristina sanding down the final, dry and casted molds for presentation. The square square model had zebra like stripes that needed to have foam and concrete pieces removed from each of them. Due to the pine needle and Ginko leaf aggregate, the sanding removed parts of the exposed aggregate. 

With each of the molds: Circle & Circle, Circle & Square, Square & Square and Square & Circle Models all needed to be individually tended to and smoothed down to a certain extent. Depending on where in relation to what island, the sanding technique was different. For example: the square & square was across from desert, so it was not as sanded down as others were. The models each have a special touch or design added to them for visual interest. 

Making the Molds to Cast


Creating the molds for the main form and the bases too much time and lots of trial and error. We used wood from the woo shop, tubes, cardboard boxes & plastic dishes from Target. We had some wood forms & some cardboard box molds break during the casting process. 

Building Edge Model for Initial Presentation


For our first model presented to the class, we made our model out of: foam, cardboard and the actual leaves of the plants from the side of the building. The model was to scale at: 1/2" : 1'-0". The individual molds were made of clay that represented our final models. 


Square & Circle Mold


This is the mixing, pouring and final dried model of the square & circle mold. Foam was used to create the circles and squares within the square design. This created some visual interest and turned out great. 

Square & Circle Mold by: Charese + Annie + Greg

Tuesday, November 25, 2008

Gateway [3 cont.]: Semi-circles & Sphere

Semicircle/Bubble Group
Danielle
Kristin
Hailey
Hope
Alli

In order to make these molds, the group had to figure out how they could make or get a mold to make a perfectly rounded semicircle. From research throughout stores like CVS and Walmart most bowls that could be bought had a flat bottom to them, which was a competing problem for the overall design. Knowing this the group searched more and came up with the idea of cutting a basketball in half (which could make two molds in one) for the bigger 'bubbles' that would edge the pathway and cheap lighting shades in the shape of a semicircle to make the smaller 'bubbles'. The aggregate used for this group was perlite because it provided just enough strength to hold the forms together and not crumble. They did not need to use pea pebbles because the semicircles were not for walking on.


The design on the inside of the basketball proved to be rather interesting and was incorporated into our design to go with the stepping stones shaped as squares and yet had circle designs with semicircle forms with square designs in them. The holes seen in the photo above were a problem with air bubbles which we addressed by tapping the air our of the concrete and adding wood glue.

Sphere Group
Phillip
Alli

Originally we had another sub-group called the sphere group that was responsible for coming up with a plan to create a concrete sphere that would be placed on the outer side of the ginko tree on our island. This sphere would go along with our concept of circles and would mirror a similar sphere from the Living on the Edge group. Many problems arose such as how would something that big dry fast enough and most importantly what could be used to make such a form? Would an exercise ball work or would the form need to be something else?
Phillip thought that he could maybe make a sphere in two halfs rather then one, so he purchased two red collinders and duck-taped the outside holes so he could pour the concrete into the new mold. He was successful in creating a sphere with two forms but the proportions of the sphere to the island and the rest of the artifacts proved to be way to small to be used in the overall composition.

Another attempt at making a larger, more proportioned sphere out of concrete was attempted by Alli. Using a large exercise ball she tested out the theory we had come up with as a group to see if filling the ball as a mold would suffice to create the sphere. The problem with this idea was that the elasticity of the exercise ball expanded as concrete was added and did not hold its form very well at all.
Sphere creation is still in the process, but in discussions between Gateway and Living on the Edge it seems likely we will have to drop this idea because of the complexity and replace it with something else.

Monday, November 24, 2008

Gateway [3]: Pathway/Stepping Stones

Stepping Stone/ Pathway Group
Sharon
Tristan
David
Rebecca
Phillip
Inspired by a video on YouTube, our sub-group that was assigned to work on the pathway decided the most efficient way to cast our pathway was to do it in a mold of threes, 12" x 12" squares that are 2" thick. We built the forms in the shop with the wood board given to us from the department and bought wood boards to cut with a chop saw for the sides to keep the concrete in the molds. In order to make our forms more stable, our aggregate went from cat litter to pea pebbles. We also added wood glue to the mix to help with the issues of air bubbles in the concrete.


To create the specific design in the surface of our concrete stepping stones we cut out cardboard shapes of the negative spaces in order to get the desired effect needed to keep with the circle theme.


To figure out how many stepping stones were needed to cast we set up a mock demonstration with papers that were 12x12 and pinned into the ground.